Guidelines for laser cutting cylinder distribution

Laser cutting is one of the most precise and technologically advanced manufacturing processes today. Most people are not unfamiliar with its application on flat materials such as metal sheets, but once it comes to cylindrical objects such as pipes or tubes, many people will have questions: how should curved objects be laser cut? The curvature characteristics of cylindrical surfaces pose natural difficulties for processing, which is why such operations require specialized equipment configuration and additional process protection. Even the slightest positioning deviation or parameter error can lead to the entire design being scrapped.
To help readers understand this process clearly, this article will gradually break down the complete process of laser cutting cylinders, allowing you to fully grasp its basic principles, common difficulties, and corresponding solutions.
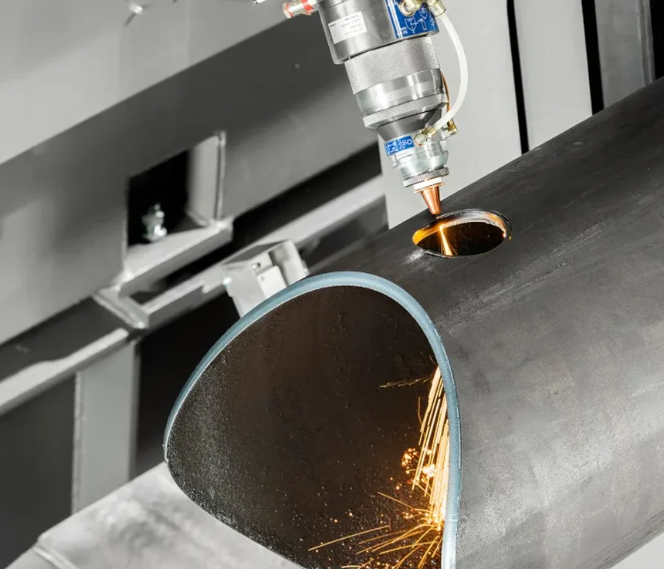
How to Laser Cut a Cylinder: Step-by-Step Guide
Undoubtedly, laser cutting a cylinder can seem complex at first, especially for beginners. However, if you know the basics and follow proper guidance, you can do it by yourself. So let’s discuss the main steps involved in laser cutting a cylinder.
Step 1: Design Your Pattern & Measure the Cylinder
The first critical step in laser cutting a cylinder is creating a design and measuring the cylinder. First, carefully measure the cylinder. You need to know its diameter, length, and wall thickness. Why? Because the diameter tells you how wide the cylinder is. Meanwhile, the length tells you how much space you have for your design.
After that, calculate the cylinder’s circumference. The circumference is the total distance around the circular surface. You can calculate it using the formula below.
Circumference = 3.14 × Diameter
The number that comes after this calculation is very important. Actually, when you create your design in software, you do so on a flat surface. Right? But in reality, that flat design will wrap around the cylinder. So make sure that the width of your design matches the exact circumference. After measuring, create your pattern using CAD or laser design software.
But this design creation is not as simple as for flat surfaces. When designing, the software cannot directly generate designs on curved surfaces. So, at this point, you have to imagine that the round pipe is opened and laid flat like a sheet. This is called unwrapping the cylinder. So instead of drawing your design on a round pipe, you draw it on a flat rectangle.
Hence, the width of that rectangle must be equal to the circumference. However, the height of that rectangle must be equal to the length of the pipe. Later, when the machine cuts the pipe, the cylinder rotates, and your flat design will wrap perfectly around it.
Step 2: Set Up the Machine & Adjust Focus Height
After finishing your design and measurements, next you need to set up the machine and height. First, place your cylinder securely in the laser machine. If you are using a rotary attachment, fix the pipe between the rotary rollers or clamps. Make sure it is straight and centered, and check its movement manually by moving it with your hand.
Remember, if the cylinder shakes or moves unevenly, the cut will not be accurate. However, if you are using a tube laser cutting machine, clamp the cylinder securely in the chuck. Make sure that the chuck holds the cylinder tightly. After setting all this, it’s time to adjust the focus height. If the focus is too high or too low, the cut will not be clean.
Adjusting focus height for curved surfaces is slightly difficult. The laser must hit the top surface at the correct focal point. You can adjust focus height by using the machine’s focus gauge tool. Otherwise, you can also adjust it manually by setting the recommended focal distance.
Step 3: Set Laser Parameters & Run a Test Cut
Once you have set the laser machine, you need to set some laser parameters. These parameters actually control how the laser cuts the material. While laser cutting a cylinder, you must adjust three main parameters. Those include:
Laser power: It controls how strong the beam is.
Cutting speed: It controls how fast the laser moves.
Assist gas pressure: It cools down the cylinder and removes debris.
Basically, adjusting all these parameters depends mainly on the cylinder’s thickness. Let’s suppose you are cutting a thin stainless steel cylinder. In this case, set the laser power to medium and the speed to high. However, for thick cylinders, you will need higher power and a slower speed so the laser can cut through completely. Lastly, also adjust the right assist gas pressure.
After setting the laser parameters, run a test cut. For this test, choose a small area on the cylinder or use a scrap piece of the same material. Cut a simple shape or small line and check the result carefully. If the cut is not clean, adjust the parameters slightly. For example, you may need to increase power, reduce speed, or adjust gas pressure. However, I never recommend changing everything at once.
Step 4: Start Cutting the Cylinder
Once everything is in order and you have run a test, the main laser-cutting process for the cylinder begins. So, place your cylinder under the laser machine and turn it on. If you are using a rotary attachment, the cylinder will slowly rotate. The laser head will move along the programmed path.
If you are using a tube laser cutting machine, both the laser head and the cylinder may move automatically. You will see the laser beam gradually remove material from the workpiece, creating precise cuts. At the same time, the assist gas blows, removes debris, and cleans the cut.
However, during cutting, do not touch the machine or the cylinder. Just observe from a safe distance. After cutting is complete, wait a few seconds before touching it. The material may still be hot. After a little time, remove and inspect the cut.
Step 5: Post-Processing
After laser cutting, the cylinder is finished, but the job is not yet done. Next, you have to move to the post-processing. In this step, ensure the cut looks professional, clean, and smooth. First, inspect the cut areas closely. Check whether the cuts are smooth and fully completed.
If you are cutting the metal cylinder, most probably, small melted particles stick to the edges. So you have to remove them using light grinding, sanding, or a deburring tool. Now, if you cut decorative patterns or holes, you will need to apply some finishes. For example, you can add polishing or coating to prevent rust.
Common Problems in Laser Cutting a Cylinder & Solutions
As I said above, cutting a cylinder with a laser is not as simple as cutting flat surfaces. Even when you follow all the steps carefully, you might face problems. Before you get started, you must know about those problems so you can tackle them right away and avoid hassle.
Problem 1: Misalignment
This is one of the most common beginner mistakes during laser cutting a cylinder. Sometimes you do not place the cylinder in the center or clamp it poorly to the laser machine. In such cases, the laser may cut unevenly, resulting in rough edges.
Solution: To tackle this problem, always ensure the cylinder is securely clamped or mounted in a rotary device. Also, check alignment by manually rotating the cylinder before starting the cut. Use small test cuts to confirm the design is in the correct position.
Problem 2: Uneven Cutting Depth
Uneven cutting depth happens when the laser does not cut the cylinder uniformly across its surface. As a result, some parts may be fully cut, while others remain shallow. Uneven depth not only makes the final piece look unprofessional but also affects the part’s functionality.
Solution: To resolve this issue, ensure the laser is properly focused on the top surface of the cylinder. Also, make sure the cylinder rotates evenly without wobbling. For shallow cuts, increase laser power slightly or reduce cutting speed.
Problem 3: Cylinder Rotation
Cylinder rotation problems occur when the pipe or tube does not spin smoothly. This can cause the laser to cut unevenly, creating a wavy, crooked design. This happens mainly because of loose clamps, a worn or dirty chuck, or insufficient lubrication.
Solution: First, tighten clamps so the cylinder cannot move side to side. Make sure all parts are clean and free of dust or debris. If your rotary device requires lubrication, apply a small amount to ensure smooth rotation.
Problem 4: Rough Edges
Rough edges generally appear in the cylinder when the laser cut leaves jagged or uneven surfaces. These rough edges affect the part’s looks and functionality. This mainly happens due to incorrect laser settings. For example, you might be using too low a power or too high a speed. Improper focus height and low assist gas pressure are also reasons for this issue.
Solution: You must first adjust the laser settings by increasing or decreasing the speed and laser power. Make sure the laser is focused correctly on the top surface of the cylinder. If you are working with a metal cylinder, make sure that oxygen or nitrogen is at the recommended pressure.

Что вы думаете об этой публикации? Поделитесь своим мнением в комментариях.