


Laser Cutting Stainless Steel Operation Guide

Laser cutting steps for stainless steel
Laser cutting of stainless steel requires adherence to a systematic set of operating procedures. Before starting the cutting process, it is necessary to ensure that both the sheet metal and equipment are in a complete state for processing, and to accurately adjust the laser parameters according to the specific grade of stainless steel. This process is not only the core guarantee for obtaining a smooth and slag free incision, but also effectively controls the range of the heat affected zone and significantly extends the service life of the laser equipment.
Prepare the Stainless Steel Sheet
Initial preparation for laser-cutting stainless steel begins with cleaning. Check for any dust or dirt on the steel surface. If so, thoroughly remove all dirt, oil, and rust from the surface. Make sure the sheet is properly cleaned before use. Besides, the sheet should be flat. Any warping can cause the nozzle to crash. Secure it firmly onto the machine’s workbed to prevent shaking or movement.
Set up the Design File
Import your vector design into laser software. Make sure to choose vector formats like DXF or DWG. Vector format works best for detailing. Check all dimensions and sizes precisely before starting. Verify all the lines for duplicate vectors or paths. Organizing the cutting work from the inside cut to the outside of the border makes it more precise.
Looking for more design inspiration and ready-to-use templates? Visit Chanelink to explore a wide collection of professional laser cutting files. Whether you are a beginner or an experienced operator, you will find free laser cut files to kickstart your next project with ease and precision.
Configure the Laser Cutting Machine
For machine configuration, select a gas nozzle based on your material thickness. You may install a double nozzle if high pressure is required. Choose nitrogen as your assist gas for a clean outcome. Set up the gas pressure accordingly. Choose other crucial parameters, such as power, speed, frequency, and duty cycle, accurately.
Focus and Test Cuts
Adjust the focal length and point it deep into the material, depending on its thickness. Stainless steel laser cutting needs negative focus settings. If everything goes according to plan, proceed with a test cut on a sample of material. Check the cutting quality and edges for burning or dross. Then reconfigure power, speed, and other parameters based on the sample material.
Cut and Finish
After a test cut, start the cutting process. Monitor the first few cuts closely. Look for spatter, warping, and anomalies on the edges. If everything is fine, let the machine complete the entire production. During this work, one must remain alert for emergencies. Carefully remove the products after cutting and clean the edges. Inspect every part cautiously.
Stainless Steel Laser Cutting Thickness Chart
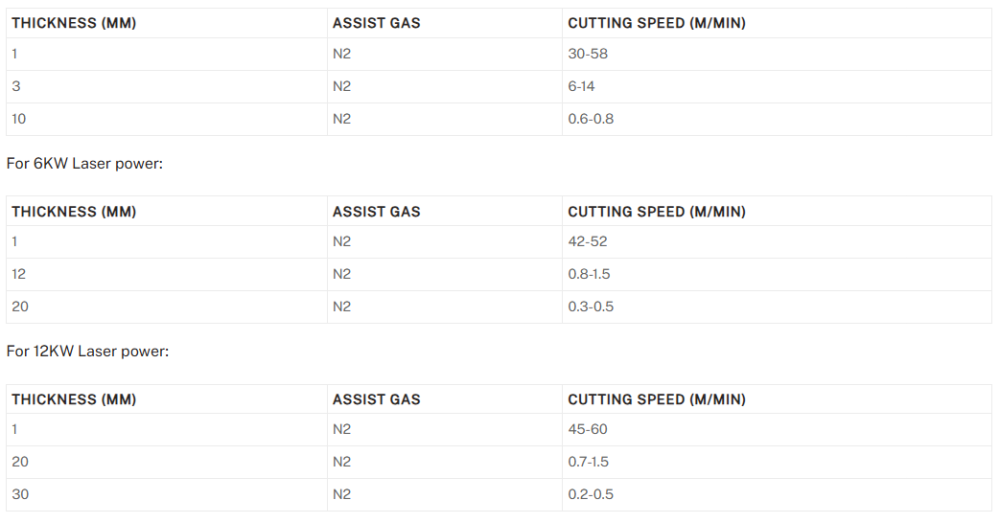
Selecting the right machine for your material is vital to achieving a smooth cut. Higher power machines are suitable for processing thicker materials. They maintain stable penetration. Lower-power lasers are ideal for thin to medium-thick steels. Besides, using the right parameters makes the result more appealing. Proper configuration ensures clean and bur-free cutting.
Below is a functional chart for fiber lasers operating on thin-to-thick materials with precise power control. It will also guide you to a particular speed.
For 3KW Laser power:
Common Problems of Stainless Steel Laser Cutting and Fixes
It is quite common to encounter problems during stainless steel laser cutting. Things might go wrong if you have set the laser parameters incorrectly. Besides, improper assist gas settings, poor focus position, and material variations can also affect cut quality. The following three problems are the most common because of these errors.
Burrs
Burs are typically small bumps that are left on metal edges. You may face it when the molten metal is not blown away evenly. Generally, using a higher cutting speed and a lower gas pressure results in burrs when laser-cutting stainless steel. To avoid this problem, use the correct parameters, reduce the speed, and allow nitrogen gas to clean the molten portions effectively.
Burn Marks
Burn marks usually appear when the material overheats during cutting. Using slower cutting causes the material to overheat. Additionally, applying more power than necessary to cut the material can also overheat it. Therefore, you should balance the speed-to-power ratio to avoid overheating. Always choose the correct power and speed based on your material thickness and cutting requirement.
Rough Edges
Rough edges mean uneven surface quality and a jagged appearance. It occurs when you use the incorrect focus length. If the beam focus is too high, you may observe an unstable kerf line. Nozzle damage can also lead to rough edges, as it can distort during use. Therefore, use the correct nozzle and clean your lens. Make sure to select the correct focus distance.
Looking for more design inspiration and ready-to-use templates? Visit Chanelink to explore a wide collection of professional laser cutting files. Whether you are a beginner or an experienced operator, you will find free laser cut files to kickstart your next project with ease and precision.

Co sądzisz o tym poście? Podziel się swoją opinią w komentarzach.








This is a great article. It cleared up a few questions I had about stainless steel cutting. Thanks for sharing.